|
|||
|
|
|||
|
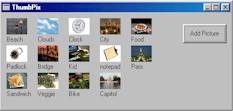
To do this we will use some cool C++ techniques and more specifically some MFC classes. [No wonder why RFC shines with the power of C++ / MFC.] What would be a better way to explain things other than through a sample that is full of fun? The sample application we will use to demonstrate dynamic RFC control creation is called "ThumbPix". Basically it is a sample that shows pictures on a form in thumbnail format. In ThumbPix, users can add new pictures to the gallery of existing ones on the fly. Each thumbnail picture is displayed with its label. Labels are shown at the bottom of their corresponding pictures.
Now on the technical side: As we all know RFC provides two built – in C++ controls to deal with pictures. These are (1) picture box and (2) image control. A picture box is a powerful "container" that holds not only pictures but also any kind of controls. However it can not do some imaging tricks like stretching etc, an image control can do just that. Now what about the label that goes underneath each picture? The obvious answer is: use RFC’s label control. To add pictures in the gallery, we will use a button on the form. Let’s name it "Add Picture". Now let’s override the "Click" event of the button and start coding.. To allow users to browse and select a picture file, we need to display a "File Open" dialog box. For this we will use MFC’s CFileDialog class. [You can also use Microsoft's "Common Dialog" ActiveX control just to do that. See our sample "ComDlg" for a tutorial on how to use that ActiveX control].
CFileDialog dlg(TRUE, NULL, NULL, OFN_HIDEREADONLY | OFN_OVERWRITEPROMPT, So now the user has selected the file, let’s go and get its title and path. CString
strNewFilePath = dlg.GetPathName(); Now is the fun part. We will now create the thumbnail of the selected picture file, (i.e. the image and the label.) We will use the "new" operator to create new control object. Since image controls are implemented through RFC’s CRImage class, here is the code to create a RFC image control: CRImage* pImage = new CRImage(); The pointer pImage holds the C++ object of the newly created image control. Now we will create real image control using "Create" statement of the CRImage class. This is needed to let the RFC library know that there is a new control that belongs to the form. This way the library does the necessary job like drawing, painting, resizing etc. for the control. pImage->Create(this, m_nID++); One interesting part of the above statement is that there are only two parameters in the "Create" statement, the parent window pointer (which is "this") and a control ID, m_nID. We do not need a third parameter for the property string here, since we have no idea about control properties at this stage. We will set its properties later on as we add more goodies to it. One small note on the control ID: we have used an unsigned integer variable called UINT m_nID; in the form's class declaration. The variable is initialized as an arbitrary value (m_nID = 220;) in the form's constructor. As you can probably figure out, the variable gets incremented as it is used in the "Create" statement. So the next time the user selects and add another picture, the new control gets created with a fresh new control ID. In a similar way, we will create a new label control using RFC’s CRLabel class. CRLabel*
pLabel = new CRLabel(); Now let’s add some properties to these two controls. We will maintain a 40x30 pixel thumbnail image and a 40 x 10 label for each picture. We do this by writing:
pImage->Width = 40; What about the positions of the new thumbnail. Let's place them in rows in a way that each row will only have 5 thumbnails. (you can change this by manipulating the numbers in the code below). To keep track of the updated position we declare two variables called m_nX and m_nY and initialize them as m_nX = 10; and m_nY = 10; in the form's constructor. So here is the code to set the positions of the image and label controls.
pImage->Left = m_nX; Also we need to make sure that the image control stretches the image in its client area. To do this, we set its "Stretch" property to TRUE. pImage->SetStretch(TRUE); Also we will set the "BackStyle" property of the label control to 0, (== "Transparent"). pLabel->BackStyle = 0; // Transparent But what about setting up the picture and caption property of our new image and label control? Here we do that..
pImage->Picture = LoadPicture(strNewFilePath); Now we need to save these pointers in lists. Why? Firstly, we may want to use them later on in the program and secondly we need to delete these object when the form unloads. If we don’t clean them up, we will end up with some nasty memory leaks. MFC provides a set of very good collection classes to save objects / data in lists. One of them is called CObArray [you can also try CObList]. CObArray provides some handy functions like "Add" , "GetAt" etc. to manipulate various list operations. As the name suggests, CObArray can only hold CObject derived class objects in it. So our image and labels are good candidates for this class. So now back to coding. Let’s declare two member variables of the type CObArray class in the form’s header. CObArray m_ImageArray, m_LabelArray; And we save the image and label controls in the array like this:
m_ImageArray.Add(pImage); Isn't this the end of coding? Oops, not really. Remember we talked about cleaning up image and label controls as the form is destroyed? We will do that in the form's destructor, like this.. CForm1::~CForm1() Now that you have finished all the coding here, build the project and run. Click on the "Add Picture" button to insert your favorite pix in the gallery. [Note: Please click here to download the source code for the sample "ThumbPix". The sample comes with some cool bitmaps which you should find in \\ThumbPix\Image directory]. Did you find this article useful? If so, please let us know. Also we need your ideas on new articles / tech tips etc.
|
| [ Home ][ Order Now ][Feedback][ Contact Us ][ About CapitolSoft ] | |
| [ Features ][ Tutorial ][ Samples ][ F.A.Q.s ][ Download ][ CDK ] |