|
||||||||||||||||||||||||||||
|
|
||||||||||||||||||||||||||||
|
|
|
||||||||||||||||||||||||||||
|
|
||||||||||||||||||||||||||||
|
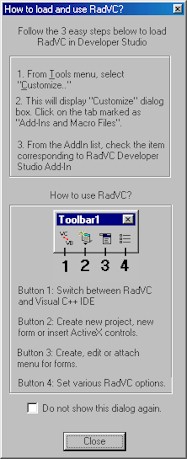
| Installing RadVC Add-In in your system. Download the setup program from CapitolSoft's web site. Make sure to download the correct version of the the setup program (use RadVC5 for VC5 and RadVC6 for VC6). Before you run the software, please make sure that you do not have any instance of Visual C++ / developer studio running. If you see any Visual C++ running, then close it, quit the setup program and re-install the software. The setup will also install RFC library and its header files in your system. . . . . . . . . . GO TO TOP . . . . . . . . . . After installing RadVC, when you run Developer Studio for the first time, you will see the following dialog box to appear on the right hand side of the DevStudio IDE. This dialog describes you how to activate RadVC add-in in Developer Studio and also how to use the RadVC toolbar once it is loaded. If you do not want to see this toolbar in future, you can check the checkbox marked as "Do not show this dialog again".
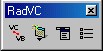
If you follow these steps correctly, you should see a mini-toolbar (containing 4 buttons, as shown below) appeared on the IDE. For your convenience, dock this toolbar somewhere on the top portion of the DevStudio IDE. If for some reason you are not able to load RadVC (and hence you do not see the toolbar on the IDE), follow the following steps. 1. From tools menu, select "Customize.." 2. This will display "Customize.." dialog box. Click on the tab marked as "Add-Ins and Macros Files". 3. Click on the "Browse.." button on the dialog to select RadVC add - in dll radVC5.dll or RadVC6.dll). You can find this dll inside the RadVC installation directory. . . . . . . . . . GO TO TOP . . . . . . . . . . RadVC toolbar has 3 buttons.
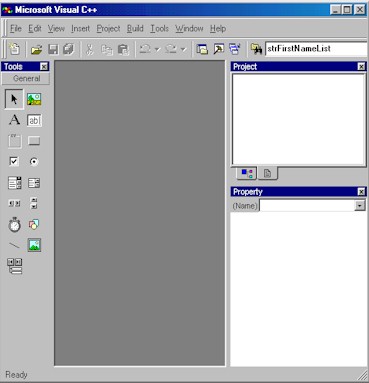
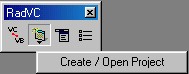
. . . . . . . . . GO TO TOP . . . . . . . . . . To move to RadVC mode, just click on the left most button on the RadVC toolbar. At RadVC mode, the RadVC hides Visual C’s main workspace and output windows and displays VB – like toolbox on the left, and project and property windows on the right as shown below.
The toolbox, project, and the property windows can be undocked and docked interchangeably on the left and right pane. Docking of these windows on the top and bottom panes are not supported. As the names imply, the toolbox contains icons of RFC controls, that you use in designing a form. The project window displays a list of project elements, like classes, implementation and header files. Property window lets you change the properties of an active form or a control on the form. Like Visual C++ IDE, the project window has two tabs, the left tab shows a list of forms and class modules, while the right tab shows the implementation and header files in the project. If there was no project loaded previously in the Developer Studio, the project and the property list boxes at this stage will look empty. We will discuss later the situation when you switch to RadVC mode with a project previously loaded. . . . . . . . . . GO TO TOP . . . . . . . . . . Creating a new project using RadVC
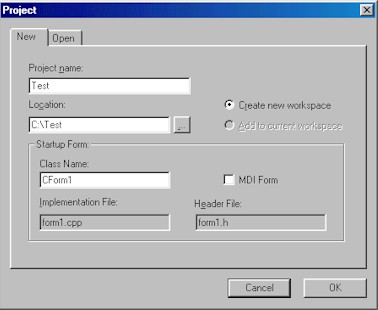
Click on the middle of the 3 toolbar buttons and select "New Project" from the popup menu to invoke New Project dialog box.
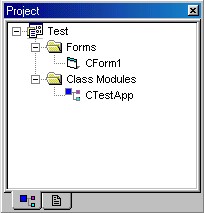
Enter the name of the project you want to create into the textbox named "Project Name". In "Location" textbox, you can edit name of the directory where you want to create the project files. You can also choose a directory by clicking on the browse button next to the location text box. When you type in the project name, RadVC will generate names of the start-up form class and its implementation and header files. You may want to change these default names to reflect the nature of the class you will be working on. If you want your startup form to be an MDI window, then make sure to check the "MDI Form" checkbox. If you are not sure on whether you need an MDI window, just leave this checkbox unchecked. You can always add the MDI form to your project later anytime during your project development. . . . . . . . . . GO TO TOP . . . . . . . . . . RadVC will generate a skeleton application when you click on the "OK" button on the "New Project" dialog box. The new project ("Test") contains two classes, namely CForm1 and CTestApp. CForm1 implements the start-up form window, while CTestApp class implements the application class.
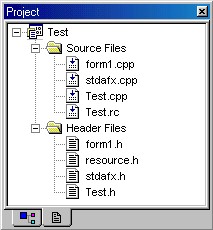
Form / Class View These classes are defined in form1.h and test.h files while they are implemented in form1.cpp and test.cpp files, as can be seen in the file view.
File View . . . . . . . . . GO TO TOP . . . . . . . . . . Like in Visual Basic, you can display any form in design mode by double clicking on the item on the Form / Class view corresponding to the form's class name. (See the figure below)
. . . . . . . . . GO TO TOP . . . . . . . . . . You can handle events for the form or controls in the same way you do in Visual Basic. The following example shows you how you can add a click event for a form. Double click anywhere on the form to bring up "RadVC CodeBar". CodeBar looks very similar to what you see on the top of Visual Basic's code editor. On the left side of the CodeBar, you should see a drop-down list box containing a list of active form and its associated controls, while on the right, you should see a list of all supported events associated with the form / control selected on the left list box.
When you select an event from the event drop down list box, RadVC will generate a function handler corresponding to that event. (as shown below)
. . . . . . . . . GO TO TOP . . . . . . . . . . You can insert new form to the existing project by clicking on the middle of the 3 toolbar buttons and select "New Form" from the popup menu to invoke "New Form" dialog box.
At this point, you can modify the default names of the new form class and its implementation and header files. You can also create an MDI Form window by checking the checkbox marked as "MDI Form". This checkbox will stay disabled if you already have created an MDI window in the project.
. . . . . . . . . GO TO TOP . . . . . . . . . .
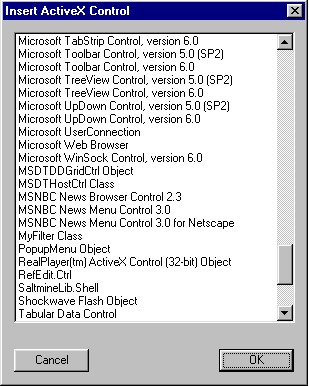
Creating / Inserting a New C++ Control to Project See Control Development Kit (CDK) . . . . . . . . . GO TO TOP . . . . . . . . . . Inserting ActiveX controls into project You can insert new ActiveX control to the existing project by clicking on the middle of the 3 toolbar buttons and select "Insert ActiveX control" from the popup menu. This should display a dialog box allowing you to select the ActiveX control you want to insert (See the figure below).
When you select the ActiveX control of your choice and click on OK button, RadVC will add the icon for that ActiveX control to the toolbar on the left. At the same time, it will generate the code for the wrapper classes corresponding to the inserted control to your project. . . . . . . . . . GO TO TOP . . . . . . . . . . Designing and attaching menu for an existing form
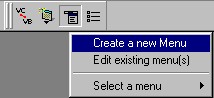
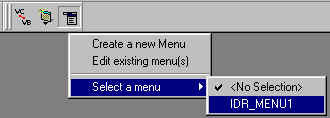
RadVC uses Visual C++'s menu designer to create and manipulate menus. In order to know more on how to add and edit menu items, please consult Visual C++'s user guide. Once you have a menu ready, you can attach that to the active form by selecting "Select a menu" and then the menu ID of choice as shown in the picture below.
. . . . . . . . . GO TO TOP . . . . . . . . . .
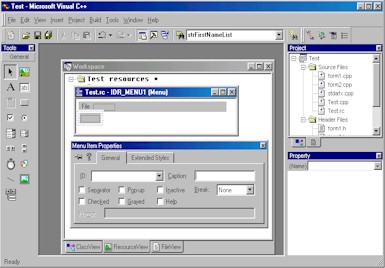
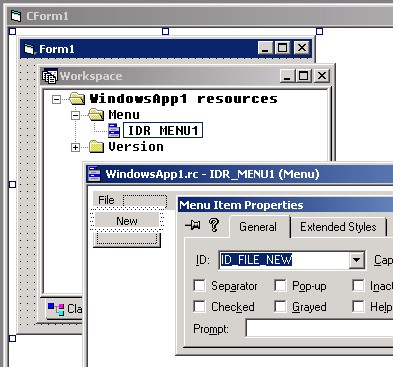
Adding Accelerator Keys to Menu Items (1) First locate the menu item to which you want to add the accelerator key. To do this, first load the menu into the resource editor and then display the property of the menu item (figure below). For example, to add an accelerator key to the menu item "New" of the menu resource IDR_MENU1, we need to locate the ID of this menu item, "ID_FILE_NEW" from its property window.
(2) Make sure that we have an accelerator table having the same name as the menu resource. If we do not have one, let us make one.
(3) Now double click on the accelerator table item IDR_MENU1 and then add an accelerator key item corresponding to the menu item ID_FILE_NEW as shown below.
. . . . . . . . . GO TO TOP . . . . . . . . . .
Displaying MDI and MDIChild windows (1) Create a new project named "Test" in RadVC mode. In he initial "New Project" dialog, make sure to check the checkbox named "MDI Form". Accept the names for the default start-up form class (CForm1). Click "ok". This will generate the code for skeleton MDI application. (2) Now create a new form with (default) class name "CForm2". (3) On the project window, double click on the tree item "CForm2"; this will display Form2 in the form designer. (4) While the form selected, change the "MDIChild" property of Form2 to TRUE. Notice that the form2's treeitem icon on the project window has been changed to reflect that fact that it is an "MDIChild" window. (5) We will be displaying the MDIChild window dynamically when the user clicks on the form. In order to do this, add a handler for "Form1"'s "Click" event and write the following code in the handler's body. void CForm1::Form_Click() Make sure to include header file for CForm2..Otherwise you will get compiler error. #include "form2.h" . . . . . . . . . GO TO TOP . . . . . . . . . . Displaying modal and modeless dialog Follow steps (1) and (2) as described above to display MDI Child window, We will be displaying the modal dialog when the user clicks on the form. In order to do this, add a handler for "Form1"'s "Click" event and write the following code in the handler's body. void CForm1::Form_Click() . . . . . . . . . GO TO TOP . . . . . . . . . . Building and running your application You will probably need to know this if you normally program in Visual Basic and new to Visual C++ To build you project, select "Build <project Name>" from "Build" menu. When the project is built, hit "F5" or "Ctrl + F5" to run your application. Please consult Visual C++'s documentation to know more on how to run and debug application. . . . . . . . . . GO TO TOP . . . . . . . . . .
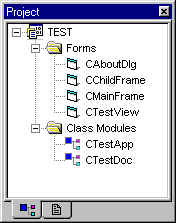
Working on a AppWizard - generated project You can add RFC controls on any CWnd-derived classes generated by AppWizard. To try this, let's first create a skeleton MDI App (with project name "Test") using AppWizard. If you know how to do so, go to next paragraph. Select "New" from "File" menu; this will display "New" dialog box. Click on the tab marked as "Projects". Select "MFC AppWizard(exe)" from the project list on the left. Enter "Test" in the "Project name" edit box. Click ok to display "Step 1" of the wizard. Click on the radio button marked as "Multiple documents" and then click on the "Finish" button. This will generate source code for and MDI application. Once the MDI project is generated, it's time to look at the classes in RadVC mode. If you are not in RadVC mode, click on the left-most button of the RadVC toolbar. The project window under RadVC will look something like the following.
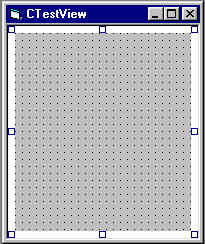
At this stage, you may want to add RFC controls in the view window. To do so, double click on the tree item marked as "CTestView". This will display form editor for the view as shown below:
You can now insert RFC / ActiveX controls in the view just like you would do on a RadVC generated form. The interesting feature to notice that CTestView is not a dialog or a CFormView based window, yet you are able to insert controls!! This is because RadVC allows you to insert controls on any CWnd derived class, not only dialog based window. The another issue to remember while working on projects created not using RadVC is to enable Ole support. This you can do by calling ::OleInitialize(NULL); from any starting point of your code (CWinApp::InitInstance() is a good place). This is needed if you wish to add RFC's OLE Drag-and-Drop feature in your project. . . . . . . . . . GO TO TOP . . . . . . . . . . Further Help - Invoking RadVC help system While you are in RadVC mode, you can have more detailed help on the properties, methods and events of form and controls by pressing "F1" key. Make sure to select a control or form on the form designer or a property item on the property window before pressing "F1". Most of the help items come with example code that you might want to try with. . . . . . . . . . GO TO TOP . . . . . . . . . . |
|
We also encourage you to check our F.A.Q section for more technical information |
| [ Home ][ Order Now ][Feedback][ Contact Us ][ About CapitolSoft ] | |
| [ Features ][ Tutorial ][ Samples ][ F.A.Q.s ][ Download ] |