|
|||
|
|
|||
|
| The control uses
bitmap (.bmp), cursor (.cur), icon (.ico), JPEG (.jpg), or GIF (.gif) files in a
collection of ListImage objects. You can add and remove images at design time or run time.
The ListImage object has the standard collection object properties: Key and Index. It also
has standard methods, such as Add, Remove, and Clear. Finally, the control features the Overlay, Draw, and ExtractIcon methods, which allow you to create composite images, draw images on objects using device context (using CDC class) and create an icon from a bitmap stored in the control. Possible Uses
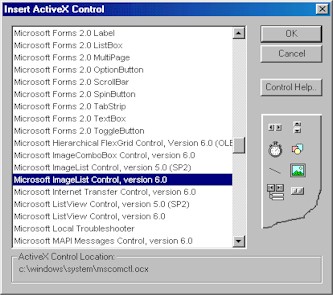
Inserting ImageList Control into Your ProjectRight-click on the RadVC toolbox and select the menuitem "Insert ActiveX Control". This will display the ActiveX control selection dialog. Scroll down the list of the ActiveX controls available in your system and select the item "Microsoft ImageList Control, version 6.0", as shown below.
Once you insert the control in your project by clicking on "OK", RadVC generates 3 wrapper classes for the control in your project. These are:
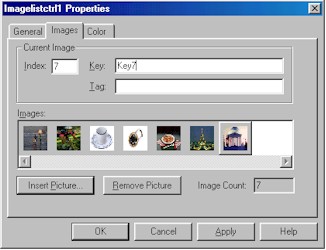
Managing ListImage Objects and ListImages CollectionsThe ImageList control contains the ListImages collection of ListImage objects, each of which can be referred to by its Index or Key property value. You can add or remove images to the control at design time or run time. Adding ListImage Objects at Design TimeTo add an image to at design time, use the ImageList control's Property Pages dialog box. To add ListImage objects at design time
ImageList control Property Pages dialog box
Note You can select multiple bitmap or icon files.
Adding ListImage Objects at Run TimeTo add an image at run time, use the Add method for the ListImages collection in
conjunction with the LoadPicture function. The following example occurs in a form's Load
event; an ImageList control named "imlImages" is loaded with a single bitmap: void CForm1::Form_Load()
{
m_AxImagelistctrl1.ListImages.Add(NULL, _V("City"), _VR(IDB_CITY));
}
Here the first parameter is always NULL ("Index" of the image). The second parameter ["City"] is the "key" to the image to be added. Assigning a unique Key property value to the ListImage object allows you to create code that is easier to read. When assigning the image to a property, you can use its Key value instead of its Index value. The 3rd parameter loads a picture for the image item. Here IDB_CITY is a bitmap ID saved in the resource of your project. You can use "Resource-on-the-Fly" technology to add or select bitmap resource in your project. The keyword "_V" and "_VR" are used to make VARIANTs used by "Add" function.You can use the inserted image later on by calling GetItem() function. CRAxImage rImage = m_AxImagelistctrl1.ListImages..GetItem(_VS(2));[_VS makes a short number to VARIANT] Determining Image SizesYou can insert any size image into the ImageList control. However, the size of the image displayed by the second control depends on one factor: whether or not the second control is also a Windows Common control bound to the ImageList control. When the ImageList control is bound to another Windows Common Control, images of different sizes can be added to the control, however the size of the image displayed in the associated Windows Common Control will be constrained to the size of the first image added to the ImageList. For example, if you add an image that is 16 by 16 pixels to an ImageList control, then bind the ImageList to a TreeView control (to be displayed with Node objects), all images stored in the ImageList control will be displayed at 16 by 16 pixels, even if they are much larger or smaller. On the other hand, if you display images using the Picture object, any image stored in the ImageList control will be displayed at its original size, no matter how small or large.
Note An exception is when you use an image from the ImageList control with the Image control. Setting the Image control's Stretch property to True will cause the image to resize to fit the control. At design time, you can specify the height and width, in pixels, of images in the control by choosing a size from the General tab of the ImageList control's Property Pages dialog box. You can choose a predetermined size, or click Custom and set the image size by typing the size you desire in the Height and Width boxes. This can only be done when the ImageList contains no images. Attempting to change the size after the control contains images will result in an error. Methods That Allow You to Create Composite ImagesYou can use the ImageList control to create a composite image (a picture object) from two images by using the Overlay method in conjunction with the MaskColor property. For example, if you have an "international no" image (a circle with a diagonal bar inside it), you can lay that image over any other image, as shown:
The syntax for the Overlay method requires two arguments. The first argument specifies the underlying image; the second argument specifies the image that overlays the first. Both arguments can be either the Index or the Key property of a ListImage object. Thus the code to achieve the effect above is as follows: // Assuming the first image's Key is "smokes", and the second is "no". m_AxImagelistctrl1 The code example above also illustrates how the MaskColor property works. In brief, the MaskColor property specifies the color which will become transparent when an image is overlaid over another. The "no" image has a green background color. Thus, when the code specifies that the MaskColor will be RGB(0, 255, 0) (an intrinsic constant), the green in the image becomes transparent in the composite image. |
||||||||||
|
|
| [ Home ][ Order Now ][Feedback][ Contact Us ][ About CapitolSoft ] | |
| [ Features ][ Tutorial ][ Samples ][ F.A.Q.s ][ Download ][ CDK ] |