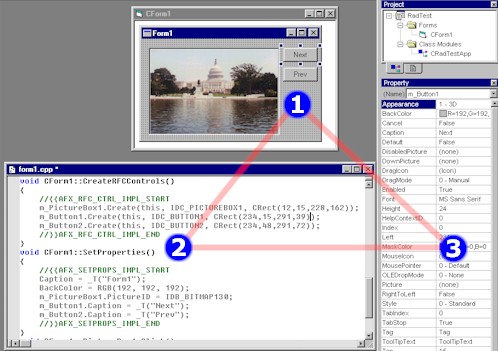
| Powerful 3-way RAD The following diagram shows a typical illustration of this powerful feature.

(1) On the Form: Change the size and position of any control on the
form and see the new position / size reflected in the source code and on the property
listbox.
(2) In the Source Code: Change any property value in the source code and
save. See the changes reflected immediately on the form and the property listbox.
(3) In the Property Listbox: Change any property in the listbox and see the
new property reflected in the form designer and also in the source code.
Why Should You Use
3-Way RAD?
You should consider using 3-way RAD for the
following two fundamental reasons:
(1) Enhanced Run-time Performance:
Traditionally the properties of the form and
its child controls are implemented through resource strings (an approach similar to the
way dialog templates are implemented in MFC). For example, the property string of the form
can be found in the form's constructor as follows:
CForm1::CForm1()
{
//{{AFX_RADVC_FORM_DATA_START
m_nPropStringID = IDS_PROP_FORM1;
//}}AFX_RADVC_FORM_DATA_END
}
Similarly, the property strings of the
controls can be found in the "Create" functions of the respective controls. [the
second argument in each statement]
void
CForm1::CreateRFCControls()
{
//{{AFX_RFC_CTRL_IMPL_START
m_SubmitButton.Create(this, IDC_BUTTON1, IDS_PROP_BUTTON1);
m_AddressText.Create(this, IDC_TEXTBOX1, IDS_PROP_TEXTBOX1);
//}}AFX_RFC_CTRL_IMPL_END
}
Each property string holds the properties of
the form / control in a comma delimited text format. At run-time, when the form is loaded,
RFC parses these properties and apply them to the respective forms and controls.
When 3-way RAD is selected, RadVC implements
design-time properties by making direct calls to the functions that are pre-bound in
form's ::SetProperties function. For example, the following block of code inside the
function ::SetProperties() is generated when the user changes some control / form
properties from the property listbox:
void CForm1::SetProperties()
{
//{{AFX_SETPROPS_IMPL_START
Caption = _T("Form1");
BackColor = RGB(192, 192, 192);
m_Button1.Caption = _T("Button1");
m_TextBox1.Text = _T("TextBox1");
m_TextBox1.BackColor = RGB(255, 0, 0);
m_TextBox1.Font = _T("Arial");
m_TextBox1.FontSize = 14;
m_TextBox1.FontBold = TRUE;
//}}AFX_SETPROPS_IMPL_END
}
At run-time, after the form and all of its
children controls are created, RFC calls ::Set properties() function and sets their
design-time properties.
The property implementation through resource
strings involves a resource file (typically a *.rc file), so re-compiling the project upon
property changes can be faster when compared to the same of a .cpp file [in 3-way RAD].
However at run-time, the parsing of properties can slow down the form loading process
significantly, particularly if the form contains a number of controls each having a number
of design-time properties.
The 3-way RAD totally bypasses the expensive
dynamic parsing mechanism and improves runtime performance. Also the function calls are
made on a "needed basis" - RFC only sets those properties that are pre-bound by
the user and not each and every property of the form or control.
(2) Flexibility in Editing Design-time
Properties:
When 3-way RAD option is selected, the
design-time properties appear more transparent to the user. The user can now clearly see
which properties of which controls / form will be set when the form is loaded. This
provides them a greater flexibility in changing (or even manually adding) design-time
properties in source code (in ::SetProperties() function). This is in contrast to the
traditional resource string based property implementation case, where it is nearly
impossible to change a design-time property on the source code level (typically in a *.rc
file).
How Positions and
Sizes are Implemented in 3-way RAD?
With "3-way RAD" option selected,
the "Create" statements for the controls have different format from that with
"string resource" based property implementation:
void
CForm1::CreateControls()
{
//{{AFX_RFC_CTRL_IMPL_START
m_Button1.Create(this, IDC_BUTTON1, CRect(140,35,231,98));
m_TextBox1.Create(this, IDC_TEXTBOX1, CRect(70,126,154,189));
//}}AFX_CTRL_IMPL_END
}
The third argument of each Create statement contains a
"CRect" value describing the position and size of the controls.
The position and size of the forms are implemented by a
CRect member variable (called m_rect) in the form's constructor, as follows:
CForm1::CForm1()
{
//{{AFX_FORM_DATA_START
m_rect = CRect(0,0,364,301);
//}}AFX_FORM_DATA_END
}
In either case, whenever the user changes the position or
size of the control on the form or the size of the form itself, the "CRect"
value is modified. The value is also changed when the user changes either of the
"Left", "Top", "Width" or "Height" properties from
the property list box. On the other hand, when the user changes this "CRect"
value in the code and save the file, this change is reflected on the form designer and the
property listbox.
How
To Use?
In order to activate this powerful feature, you need to
select RadVC menu item "3-way RAD." (Figure below) by
clicking on the "Options" button and make sure that it is checked.

The user can use 3-way RAD with the existing resource
based property implementation.
. .
. . . . . . . GO TO TOP . . . . . . . .
. .
"Resource-on-the-Fly" IntelliSense
Now in this version, you can add new resource just by
typing resource prefix anywhere in your code editor. The prefixes for "bitmap",
"Icon", "Cursor" and "String" are "IDB_",
"IDI_", "IDC_" and "IDS_" respectively. Here is a typical
example of adding new bitmap resource.

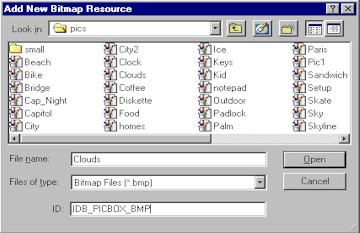
Once the menu "<Add New Bitmap>" is
selected, RadVC will display an enhanced "File Open" dialog. In this dialog, the
user can select the bitmap file to add and also the ID (an IDB_) name for the bitmap
(picture below).

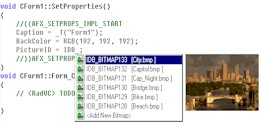
The user then can also select a bitmap resource from the
list of existing bitmaps (picture below).

This IntelliSense works with any kind of VC++ supported
resource. Here is an example of selecting an "Icon" resource "on the
fly".

And here is an example of a text string

. .
. . . . . . . GO TO TOP . . . . . . . .
. .
New Options
RadVC 1.2 has added a fourth button to its toolbar. The
user can set various RadVC options using this button. When clicked on this button, RadVC
displays a pull-down menu as shown below.

The are 5 options the user can select..
(1) Refresh Project Info: RadVC deletes the existing
project info file (<project name>.dat file) and creates a new one by reading the
active project. This option is particularly useful, if the project need to be repaired.
(2) Grid Size: Displays a grid size dialog allowing users
to change form's grid size.
(3) 3 - Way RAD [described above]
(4) Deactivate IntelliSense: Activate or deactivate RadVC
IntelliSense.
(5) Views: Shows or hides RadVC windows. (toolbox,
project and property windows).
. .
. . . . . . . GO TO TOP . . . . . . . .
. . |

