| To create a new RAD C++
control, you need to invoke the "New C++ Control" dialog. To do this, click on
the second button on the RadVC toolbar and then select "New C++ Control" menu
item from the drop-down menu as shown below: 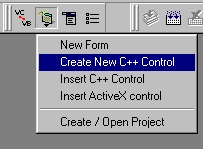
You can also invoke the dialog by clicking
right mouse button on any place on the RadVC toolbox and then selecting "New C++
Control" context menu item:
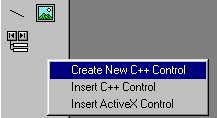
Context menu when clicked on
the RadVC toolbox
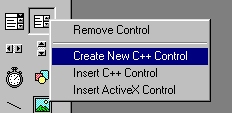
Context menu when clicked on
a tool button
Selecting the menu item will display
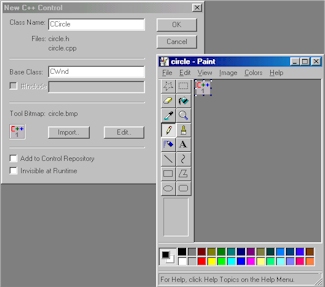
"New C++ Control" dialog box as shown below.
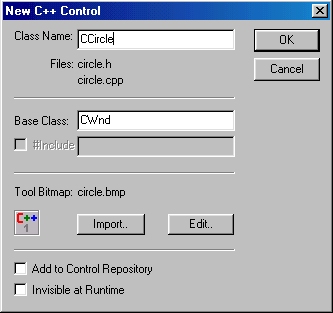
In this dialog, you can make the following
changes:
(1) Control Class
Name: Change the default class name from "CControl1" to
"CCircle" for our "Circle" control. As you change the control class
name, the header and the implementation file names for the control will also change. For
our "Circle" control, these files are "circle.h" and
"circle.cpp" respectively.
(2) Base Class Name: For "Circle" control, Keep the base class name
("CWnd") unchanged. If you are not that much familiar with MFC, CWnd is a MFC
class that encapsulates various Windows functionality. You should consult Visual C++
documentation to learn more on various MFC classes.
If you choose a base class other than a MFC
class, RadVC will insert a [#include "filename"] statement in your control's
header file. Here "filename" is the name of the file where the base class is
declared. In the dialog, this file name is shown in the edit box next to the
"#include" label. You need to edit this name if the actual base class file name
is different from what is shown in the edit box.
If you want your control class not to be
derived from any other class, simply leave this editbox blank.
(3) Import / Edit Tool
Bitmap: For a new RAD C++ control, RadVC supplies a
default tool bitmap [C++1]. For our "Circle" control, you can edit this bitmap
by clicking on the "Edit" button. When clicked, RadVC will display Windows
"Paint" application with the tool button bitmap loaded (figure below).
Once you finish editing the tool button,
save the file and close "Paint" program. This will change the tool bitmap in the
dialog:

You can also import another tool bitmap by
clicking on the "Import" button and then browse the bitmap file of your choice.
(4) Option "Create in
Control Repository": Check this option if you
want your control to be stored in RadVC "Control Repository". Click here to know more on the "Control
Repository".
(5) Option "Invisible
at Runtime": Check this option if you want your
control not to be visible when the application runs. A typical example of an
"invisible" control is the "Timer" control found in RadVC toolbox.
Once you finish setting up various options
in the the "New C++ Control" dialog, click on the "OK" button.
RadVC will now add a tool bitmap in the
RadVC toolbox for our circle control, as shown bellow. In the next section,
we will see how we can play with this control in a test application.
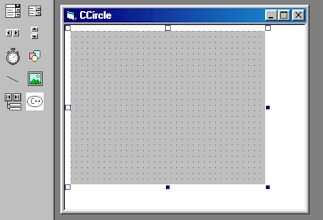
In addition to adding the tool bitmap, RadVC
will also display a blank form in the Developer Studio client area. You can add other
controls from RadVC toolbox to your control by using the familiar drag and drop operation.
Our "Circle" control won't be having any "child" control in it, but
you can look at some other controls in the "Samples"
section.
In the background, RadVC will generate
several files for the control. We will examine these files in more detail in Part 3: Examining Control Code section. Also, if there is
any project active in the workspace, RadVC will include these files in the project.
Next >> Part 2:
Testing the New Control
Related Link: |
