| (1) The Benefits of
Using Single Click ActiveX: (a) Easy COM Development:
COM is beautiful and it has a very rich architecture to
create self contained software components that works with almost any Windows development
environment, and with any language. But let's face it: it is fairly hard to write a simple
COM component in C++. Furthermore, to understand fully about its underlying architecture,
it may take some time.
RadVC's Single Click ActiveX technology hides all these
complexities of creating COM components from you so that you can focus more on the
C++ component development.
(b) Use Single Code Base: Until now, C++ component
developers need to maintain two separate code bases for their C++ library (.lib/dll etc)
and ActiveX component developments. This often causes them to cut and paste code between
two different projects and thus result in error prone development. With Single Click
ActiveX technology, Component developers do not need to think of maintaining separate code
bases . This reduces component development a lot more faster and error free.
(c) Forward (.NET) compatibility:
RadVC's 'Single Click ActiveX' serves a technological bridge
between the existing native C++ code and the code based on
Microsoft's upcoming Web - centric initiative, .NET
framework. Using a technology that uses
'Single Click ActiveX', a C++ developer will be able to port
native C++ components to .NET framework component with ease. [ The
"Native C++ to .Net" technology is under development and
will be released with the release of RadVC.Net]
(2) How "Single
Click ActiveX" Works?:
As the name
suggests, it truly needs one 'Single Click" to make an
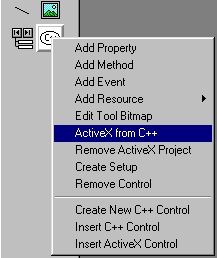
ActiveX / COM component from your RAD C++ component. Simply
right-click on your RAD C++ component icon on the RadVC toolbox
and select "ActiveX from C++" from the popup menu item.

(3) How to Create an
ActiveX Control from a C++ Control:
Once you select the
build command "ActiveX from C++", RadVC will
generate a temporary project to build your ActiveX project. In our
'Circle' project, this will be called 'CircleX'. After the project
is generated, RadVC will automatically start building it as shown
below. After the build is finished, the ActiveX control ('CircleX')
will be placed in the main project folder. [For RAD C++ control
residing in the control repository, the ActiveX control will be
placed in the <RadVC Install Directory>/ActiveX directory].
At this point, you can remove the ActiveX project by selecting
"Remove ActiveX" menu item from the right-click popup
menu.
--------------------Configuration:
CircleX - Win32 Release--------------------
Creating Type Library...
Processing C:\WINDOWS\Desktop\TestControl\CircleX\CircleXCtl.odl
CircleXCtl.odl
Processing C:\Program Files\Microsoft Visual Studio\VC98\INCLUDE\oaidl.idl
oaidl.idl
Processing C:\Program Files\Microsoft Visual Studio\VC98\INCLUDE\objidl.idl
objidl.idl
Processing C:\Program Files\Microsoft Visual Studio\VC98\INCLUDE\unknwn.idl
unknwn.idl
Processing C:\Program Files\Microsoft Visual Studio\VC98\INCLUDE\wtypes.idl
wtypes.idl
Compiling resources...
Compiling...
StdAfx.cpp
Compiling...
CircleX.cpp
CircleXCtl.cpp
_circle.cpp
Generating Code...
Linking...
Creating library Release/CircleX.lib and object Release/CircleX.exp
Registering ActiveX Control...
CircleX.ocx - 0 error(s), 0 warning(s) |
(3) Modifying
ActiveX Project:
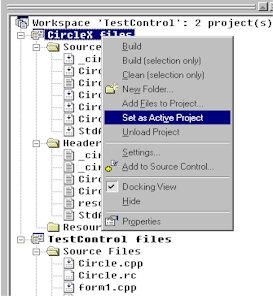
If you encounter any
error while building your RAD C++ based ActiveX project, or if you
want to modify the ActiveX project, then first switch to Visual
C++ mode and then set the ActiveX project as the active project
(as shown below). Now make necessary changes in the ActiveX
project and rebuild the project.

Next>> Part 11: Creating Setup (Package / Assembly) File for
the Control
|
