- The Traditional
Way
- If you are a hardcore VC++
developer, you must have noticed that adding splitter support to
VC++/MFC apps has some serious limitations and also the plumbing job
isn't that simple and straightforward. On the limitation side, you
can only add splitters to MDI child windows and not all other form
of windows, such as dialogs or even plain vanilla windows. Also, the
splitter pane windows must be derived from CView class, they can not
be controls such as a listbox or an editbox. Adding the support also
isn't very simple either.. you need to override some functions in
the MDIChild window class and write some code to do that.
-
- The RAD way
- RadVC's splitter support does not
have any of these limitations you normally face in traditional VC++
apps. First, when you use RadVC, you can add splitters to just any
kind of windows, not only to MDI child windows. Also splitter pane
windows can be any kind of controls, they do not need to be
contained inside CView derived view windows. What is more amazing,
RadVC does not require you to write a single line of code to do all
these complex stuff. RadVC's drag-n-drop programming technique will
take care of these tough plumbing job for you.
-
- What You Need
- VC++ 6.0 with
RadVC 1.2
-
- CoolPix - An App
with Splitter Window
- To demonstrate how easy and flexible
it is to have splitter windows inside your C++ apps, we will build a
test application called CoolPix. CoolPix has only one form, which is
"sliced" vertically into two panes. The left pane is a
list box control, listing some of the cool pictures of your
collection. The right hand pane is a CWnd-derived RAD C++ control,
called "CRightPane". When you
click on a picture item in the left-hand side listbox control, the
picture gets displayed in the right-hand side pane. We could have
used a picturebox control in place of the CRightPane control, but we
have got some interesting ideas to implement inside this control.
We'll get to this in more detail when we will enhance our CoolPix
app in the later part of the article.
Here is how we build the app
(1) Using RadVC, create an
application with name "CoolPix". RadVC brings up the startup
form in its client area. Change the caption property of the form to
CoolPix.
(2) Insert the RAD C++
control CRSplitter into RadVC toolbox. If you don't know how to insert a
RAD C++ control,
please visit this page to learn more. It's as easy as 1-2-3.
(3) Create a skeleton RAD
C++ control called "CRightPane".
(4) Drop a listbox control
and a "CRightPane" control in the "CForm1" form. These controls will act as panes in
our form. You do not need to set the position and size properties (Left,
Top, Width and Height properties) of these controls. The splitter control will take care
of everything.
(5) Drop the CRSplitter
control in the form. Like the two "pane" controls you inserted
earlier, you do not need to set their position and size properties.
After you have added these
controls in design mode, your form will look something like this:
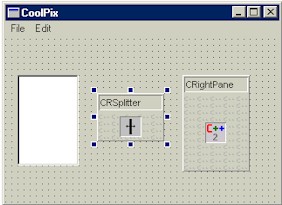
The CRSplitter control
is the heart of our "splitter" form. So let's first examine the
properties it supports.
| Property |
Description |
| SplitVertical |
Defines
whether the splitter will split the form vertically or horizontally
(Boolean) |
| SplitterSize |
Size
of the control (sizing bar). When SplitVertical property is set to
TRUE, it is the width of the splitter bar. Likewise, when SplitVertical
is set to FALSE, it is the height of the splitter bar. [Default
value is 4] (short) |
| BackColor |
Background
color of the splitter. (COLORREF) |
| Pane1SizePerc |
Size
of the first pane as a percentage of the total form size. For
example, when SplitVertical property is set to TRUE and this value
is 20, then the left pane will occupy 20% of the total form width.
[Default value is 30]. (short) |
| Pane1Size |
Fixed
size of pane1 in pixel. When this property has a positive value, the
first pane always appear with a fixed size and hence is not
proportionally resized. When this value is set to a negative number,
the panes are proportionally resized according to the
"Pane1SizePerc" property.
[Default value is -1]. (short) |
| InvertPaneOrder |
Toggles
the order in which the panes appear on the form. (Boolean) |
| DrawBevel |
Determines
whether to draw a bevel around the splitter bar. (Boolean). |
| AutoResize |
Determines
whether the control should automatically resize the panes as the
form gets resized. (Boolean). When this value is set to TRUE
(default value), the splitter control periodically checks the
size of the parent window( typically a form) and makes sure that the
panes are resized according to "Pane1Size" or "Pane1SizePerc"
properties. When a more responsive resizing operation is intended,
this value should be set to FALSE. However, in this case the user
should override the "Resize" event of the form (or generic
WM_SIZE event), and call "Resize()" method of the splitter
control from the event handler. |
As you can probably think,
the set of properties CRSplitter control supports, give you a lot of maneuvering
power with the splitter support in a form. For our CoolPix sample, there
is no need to make any change in the default set of properties, however
you are free to play with the properties to find out how things really
work.
Before we go further, let's
have a trivia game. Here
is the question: "How do you hide the splitter bar so that the panes
can not be resized?" [Remember
we don't have any property like "HideBar" or "EnableResizing"]. You'll know
the answer as we finish the article.
We won't be going too much
into the "under-the-hood" stuff, like how to display the picture
on the right pane as we click on a listbox item on the left pane. The code
is very straightforward and can be downloaded from here.
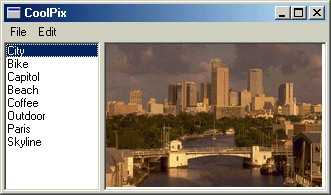
Now load the
"CoolPix" project in DevStudio and compile it. When you run it,
our CoolPix will appear in its full glory like this:
CoolPixEx - An
Enhanced CoolPix App
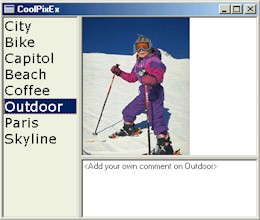
CoolPixEx enhances our
original CoolPix app by adding a horizontal splitter in the
right hand side pane. The selected picture is now shown in the new
right-top pane. The newly added right-bottom pane now shows a
textbox enabling users to add some note on the displayed picture.
You have probably seen this kind of state-of-the-art user interfaces
in applications like Microsoft Outlook.
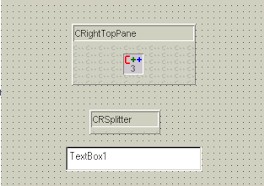
To do this we need to create another
CWnd-derived control called CRightTopPane. Next, open the CRightPane
control window by clicking on the "CRightPane" treeitem in
the form list (in RadVC's project window). Now, we need to add our
controls in the right pane window. This is very similar what we did
while designing the main form. As you can probably expect, we need
to add one CRightTopPane control, one CRSplitter control and a
textbox control. Since we want our panes to be horizontally split,
so we need to set the "SplitVertical" property to FALSE.
Once we finish the design, the CRightPane will look something like
this:
The code for the "CoolPixEx"
isn't very different from our original "CoolPix" app. As
you can probably guess, CRightTopPane is the control that now
displays the picture, so we need to move the drawing code [in ::DrawControl()
function] from CRightPane class to CRightTopPane class. You will
find the rest of the code very easy to follow. Now, download
CoolPixEx code from here,
build and then run. Here is what it will look like.
Answer to Trivia
Question:
Question: How do you hide the
splitter bar so that the panes can not be resized?
Answer: Set the "SplitterSize"
property to zero.
Did you find this article useful? If so,
please let us know. Also we
need your ideas on new articles / tech tips etc.
|